


Being a musician in modern times is challenging—it takes time to reach that breakthrough moment where you can sustain yourself solely through music. The cost of acquiring music gear, software, and DAWs can be significant, so budding music producers need to be mindful of where they invest their money.
Oftentimes, producers end up purchasing items that may not be the right fit for them. Thankfully, websites like Reverb make it easier for musicians to sell their gear online without much hassle. There are plenty of reasons why someone might consider selling, and buying second-hand music equipment in good condition has become a common practice.
Selling your gear on Reverb is a great option because, thanks to its massive popularity, there are plenty of users looking to buy used gear. Additionally, transactions are secure, so you don’t have to worry about not receiving your payment.
If you are a musician who is looking to sell music gear on Reverb, we have prepared a step-by-step guide for you.
Step 1: Setting Up Your Reverb Seller Account
Selling on Reverb starts with creating an account. If you already have one, simply log in.
- Go to Reverb.com and sign up if you’re a new user.
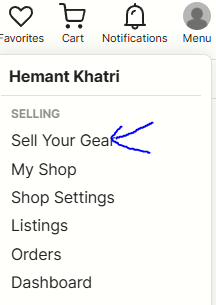
- Once logged in, locate the “Sell Your Gear” button at the top of the homepage, next to the search bar. Click it to start your listing.


Step 2: Preparing Your Gear for Sale on Reverb
Before listing, it’s essential to make your gear as appealing as possible:
- Inspect & Clean: Ensure your gear is fully functional and clean. Remove dust, fingerprints, and any minor scuffs if possible.
- Gather Accessories: Buyers appreciate original packaging, power adapters, cables, or manuals, so include them if available.
- Check for Issues: If your gear has scratches, dings, or missing parts, mention them honestly in your listing to avoid disputes later.
The better your presentation, the quicker your item will sell!
Step 3: Creating a Compelling Listing
Reverb provides an intuitive listing process to help you showcase your gear effectively:
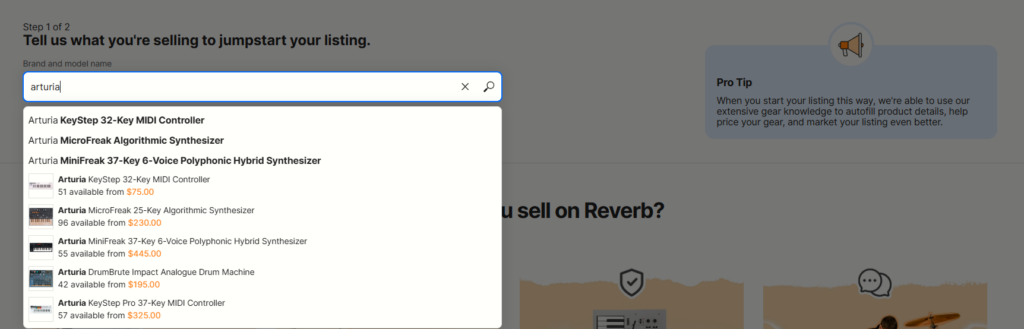
- Find Your Gear on Reverb: You can search for your equipment in Reverb’s database and let it autofill details or start from scratch if you prefer manual entry.
- If it’s your first time listing on Reverb, you’ll have to add a few details such as your Shop Name, Address and Language preferences.
- Enter Key Details: Include specifics like brand, model, year, and finish. Make sure your title accurately reflects what you’re selling.
- Upload High-Quality Photos:
- Use original images (no stock photos or screenshots).
- Capture multiple angles, including close-ups of any wear or unique features.
- Follow Reverb’s photo tips for best results.
- Select Condition: Choose a condition that accurately reflects your gear’s state—ranging from Mint to Fair. Check Reverb’s condition guide for details.
- Write a Detailed Description:
- Mention modifications, upgrades, or notable wear.
- Highlight why your gear stands out.
- Consider adding a YouTube demo video showcasing how the gear sounds or functions.

A well-crafted listing increases buyer trust and boosts sales potential.
Step 4: Managing Inquiries and Offers
Once your listing is live, potential buyers may reach out with questions or offers.
- Respond Promptly: Quick and professional responses increase your credibility.
- Negotiate Wisely: You can accept offers, counter them, or decline. Buyers often expect some negotiation.
- Be Transparent: If a buyer asks about wear and tear, be honest. Transparency leads to smoother transactions and better reviews.
Staying active on your listing helps move your sale forward faster.
Step 5: Finalizing the Sale and Shipping the Gear
Once a buyer makes a purchase, it’s time to ship:
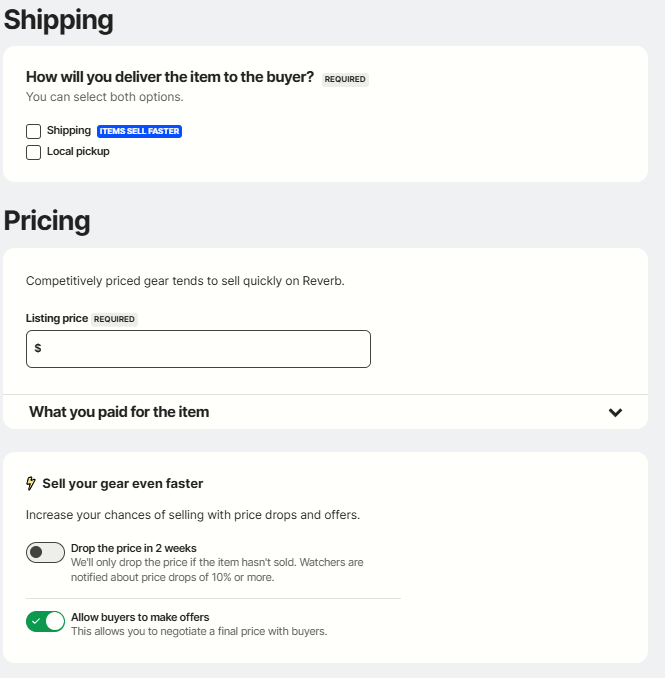
- Choose Shipping or Local Pickup:
- Shipping: Enter your location and item dimensions, and let Reverb calculate the shipping cost.
- Local Pickup: Arrange a safe, public meetup with the buyer.
- Optimize Shipping Costs:
- Reverb helps you secure the best shipping rates.
- Offering free shipping or a flat rate can make your listing more attractive.
- Decide if you want to ship internationally.
- Pack Your Gear Properly:
- Use sturdy packaging to prevent damage.
- Consider adding insurance for high-value items.
- Confirm Shipment & Provide Tracking: Once shipped, update the buyer with a tracking number.
A smooth delivery ensures positive feedback and builds your reputation.
Step 6: Maximizing Your Selling Potential
Want to sell faster? Try these strategies:
- Use Reverb’s Price Guide: Set a competitive price using data from similar sold listings.
- Enable Automatic Price Drops: This feature gradually reduces your price every two weeks, notifying interested buyers.
- Accept Offers: Let buyers make offers to increase your chances of selling quickly.
- Boost Visibility with Reverb Bump: Promote your listing by setting a percentage fee to improve its ranking.
The more strategic your listing, the quicker you’ll close the sale!
Selling on Reverb is a straightforward process if you follow the right steps. From creating a standout listing to handling negotiations and shipping, each stage plays a key role in ensuring a smooth and profitable transaction. Selling your gear is a great way to part with equipment you no longer need in order to acquire new gear. To sell your gear on Reverb please refer this link.
Also Read:
Output Introduces Co-Producer: A New Plugin to Find the Right Samples
DJ with Apple Music Lets Subscribers Make Their Own Sets

This post was originally published on this site be sure to check out more of their content